 Before I get started painting, I go out to the backyard and take a look at the trees and bushes for a few minutes. Photo refs are okay, but its always good to take some time to study the real thing when you can.
Since so much of the painting will be green, I know that I'm going to need plenty of variation of the color to create the illusion of depth. I select Painter's mixing palette and mix some yellows, greens and blues.
I'm going to continue working beneath the sketch layer for the rest of this section.
Step Three:
I create a new layer and paint in the sky and tree shapes. Next, I create another layer and begin painting the foliage, working mainly from dark (blues) to light (greens). I use yellows for highlights. Later, when I'm refining the leaves, some  areas will get erased out, revealing parts of the trees. That's why I used separate layers.
Step Four:
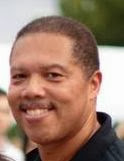
Now I create another layer and start to work on the figure. Early into the process, I decide to move the figure layer behind the foliage layer. I get my base colors down and work in light reflecting from the foliage and the sky. I use the blues for the darker shadows on the figure. I'm working at nearly 100 percent opacity, using my pen's sensitivity to control the coverage.
Note: The image that I'm using to illustrate this part is a re-paint. I got into a flow and before I knew it, I had painted past this part without taking a screen cap. I did a quick re-creation for continuity.
Step Five:
I reduce the opacity to 10 percent and begin lightly glazing the skin, mainly with the base (mid-tone) color. I  glaze with the light and dark to a lesser extent. I glaze the blue shadows with the dark. This all helps to unify the painting.
I usually work with a restricted palette. Its easier to control and it forces me to really think about my color choices and how to best apply them.
We'll be working above the sketch layer the rest of the way.
Monday, June 23, 2008
Painting a Fantasy Portrait - Part 2
Subscribe to:
Post Comments (Atom)


No comments:
Post a Comment